• Hello Guest, welcome to the initial stages of our new platform!
    You can find some additional information about where we are in the process of migrating the board and setting up our new software here

    Thank you for being a part of our community!

1984 242 Turbo Restoration!

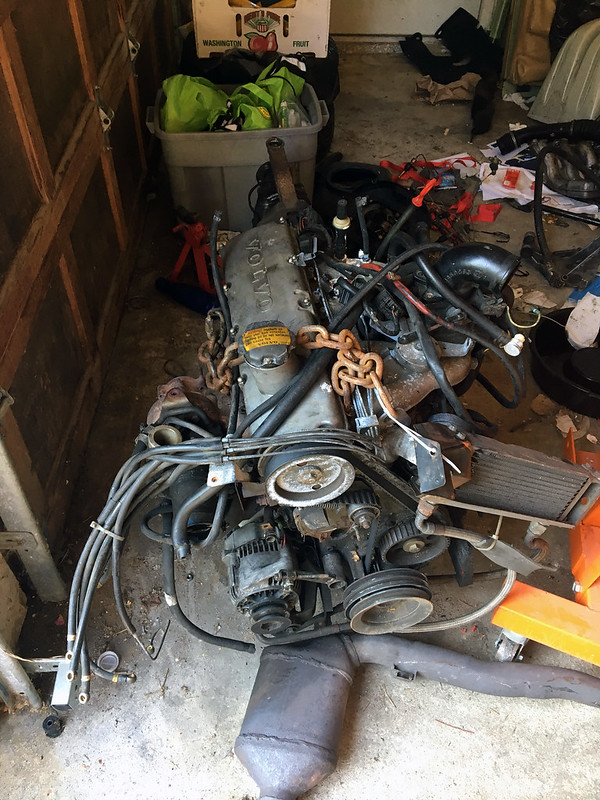
^Too big. The B+ terminal is about 7mm away from the oil filter casing, so you can do impromptu welding while changing your oil. Also doesn't fit right with the oil pressure sender. If you're going to run a 740-style AC and alternator bracket on the driver's side, then the big body Bosch alternator works fine.

Denso alternator is better than the big body Bosch anyway.
 
Looking great. For the Bosch to Denso if you get the whole shebang from Philski he normally includes the tensioner piece to make it happen. It's a bolt on affair pretty much. I have an 80a from him on my b21ft and it fits/works great.

How'd you manage to get the do88 sponsorship? Do they just require tagging them on social media or whatever?

I actually got my 100a from him! Got the tensioner from someone else but it seems the tensioner needs some sort of space on the mounting ear of the alternator? I could’ve been asleep while mocking it up when removed from the car. I’m not sure if the bracket that holds the alternator which is bolted to the passenger side of the engine block (turbo car) is the same or difference than the one that I should be mounting the later model Denso amp with.

I already got an OEM 55a Bosch to install seamlessly so I can use the car while I figure out the 100a.

There’s a cool retro car alarm installed on this car that’s got some funky wiring going to the ignition coil. It’s pretty cool. I’ll add some pictures of it later this week.
 
The correct alternator adjuster is one from a 1985 or newer B230 equipped 240. The ones that Phil seems to be selling with his look to be the ones used on the 7/9 series cars.

Correct style is shown in this pic of my 245's B21FT when I had it pulled from the engine bay... Note the long collar where it mounts to the block and the curved adjustment arm.


I believe I have everything I need to mount this, I was trying to figure it out with the curved adjustment arm behind the ear with the carriage bolt going through, not in front of it. Seeing your picture was super healthful, thank you!

p.s. I’m jealous of how tidy your K-jet lines are, both my cars are missing all the brackets that hold the lines together
 
No prob. Yeah, the B230 alternators are backward, compared to the earlier B21/23 alternators. One exception being the B23FT engine, which uses a similar setup to what's shown here, but with a shorter bushing holder that has a spacer between it and the block. Uses a longer bolt.

Heh, some of the bracketry is MIA... Currently, the lines are zip tied to the bracket on the exhaust side of the head...
 
I appreciate your guys? input, I?ll probably go with a Denso alternator! When searching by application, only Bosch is coming up. Is there a go-to Denso model or part number for me to search? Also, is that adjustment bracket a part I can buy new online or a pick n pull find?

Did you see this which hiperfauto posted?

I also recommend this upgrade.

Probably quickest to just grab it off a car at the yard...

With respect to the alternator, yeah, get it from philski...


I also have a good stash of tested and confirmed working Denso 100 amp alternators.

;-)
 
I’ve had to take a break from fixing this baby up for the past month… doctor’s orders after a hernia repair surgery.

Today was the first day I’ve done anything to it since before my surgery at the beginning of September. I didn’t do much, just installed the new polyurethane alternator bushings. The old rubber bushings were shot and pretty easy to remove. No special tools required. But the new bushings required some finesse and I’m pretty proud of the way I Macgyver’d them in without putting too much strain on my still recovering body. It turns out you don’t need a special tool to install new bushings; all you need is a 27mm socket, a large flat washer, and some channellock pliers :lol: Took me all of 15 minutes!
 
timing belt confusion

Today I came to a crossroads. I?m installing a Gates Racing Kevlar timing belt on the B21FT and something seems to not be quite right.

The marks are lined up on the cam gear and intermediate shaft gear, but when pulling the belt taught around the crank gear it seems to be half a tooth off.

If I back it up half a tooth so it sets in the grooves of the gear, it seems to have too much slack going back to the intermediate shaft gear. But I am unable to pull it tight enough to make it half a tooth further to line up in the grooves of the crank gear.

I?m still racking my brain as the marks are lined up properly on the cam and intermediate shaft gears. Is it okay for me to give it that half tooth of slack? Or can someone point out what I may be doing wrong?
 

Attachments

  • 92A66474-A2CE-4747-B72C-0526BDD2CE30.jpg
    92A66474-A2CE-4747-B72C-0526BDD2CE30.jpg
    175.3 KB · Views: 419
Does that belt have marks on it? If so just line those up and set the tensioner. Once it's set it will pull any slack out.

If not get it on and tensioned and rotate the crank around twice, if it still lines up at the marks your good.
 
It looks that you are trying to put a round tooth belt on square tooth pulleys?

Is that so? If yes...

Do not pass go
Do not collect $200
Go directly to Jail

If not, that belt looks pretty frayed and probably should be retired.
 
FCP has different part numbers for that belt, 93+ was round tooth. 76-92 was square tooth. There isnt a b21/23 round tooth crank gear, so you'll need the square tooth belt.

You can switch to round tooth on a B21/23...but I dont know who makes/sells the right crank gear. Here's one I have on my B23, it uses a seperate woodruff key.

113727084.jpg


I start by wrapping the belt around the crank gear, then up to the intermediate shaft, then the cam. Its usually snug around that side, with slack on the far side of the cam gear, where the belt has to slide over the tensioner pulley. I've never started on the top and tried doing the crank last.
 
It looks that you are trying to put a round tooth belt on square tooth pulleys?

Is that so? If yes...

Do not pass go
Do not collect $200
Go directly to Jail

If not, that belt looks pretty frayed and probably should be retired.

Definitely not, I may be a noob but I?m not stupid haha. It?s definitely a square tooth belt, though I can see how it does almost look like a round tooth. When it?s set on the gears it fits quite nicely. It?s a brand new belt, the fray I think it just from how it was cut ? it?s Kevlar, not rubber, so it?s a little more fiber-y
 
Does that belt have marks on it? If so just line those up and set the tensioner. Once it's set it will pull any slack out.

If not get it on and tensioned and rotate the crank around twice, if it still lines up at the marks your good.

The belt does have marks on it. I started with making sure the mark lined up with the notch on the timing gear, then made sure the 2nd mark lined up with the notch on the aux shaft gear at the 3 o?clock position. My struggle was getting it around the crank gear after putting it in the proper place on the first two
 
timing belt update

So I was able to figure out the timing belt situation today.

Basically, as I did yesterday, I made sure the marks on the belt lined up properly with the marks on the cam and aux gears. What I did today that made it go around the crank gear properly was removed the belt tensioner from its seated position against the front of the engine. With it pulled out a little bit so the tensioner pulley could move as far toward the exhaust side as possible, it gave the belt just enough slack to fit around the crank gear. It sat tight, and then I wiggled the tensioner back into place and released the spring.

It’s funny how you can run into a problem and then just sleep on it and go straight through it the next day. The belt is now properly installed, with the marks lined up as they should be and teeth seated perfectly in the grooves of the the gears. I did install a new Volvo tensioner and spring as well. With the timing gear and auxiliary shaft gears lined up with their marks, I placed the timing cover over and found the notch on the crank pulley lines up perfectly with the 0? mark on the timing cover. Presto!

Now it’s timing to tackle the next issue of my new water pump studs being too long…
 

Attachments

  • 329F4CEE-78E3-44B2-9768-8FB5CC9A0D53.jpg
    329F4CEE-78E3-44B2-9768-8FB5CC9A0D53.jpg
    201 KB · Views: 389
  • EB1097B1-828A-4802-A2F7-5B84179190FC.jpg
    EB1097B1-828A-4802-A2F7-5B84179190FC.jpg
    195.1 KB · Views: 385
  • 304A61F9-0BCC-4FD9-810E-AEE21D3DD0F0.jpg
    304A61F9-0BCC-4FD9-810E-AEE21D3DD0F0.jpg
    196.1 KB · Views: 389
  • FE6D1100-7D48-4C9E-AEC3-D626A2F7925F.jpg
    FE6D1100-7D48-4C9E-AEC3-D626A2F7925F.jpg
    196.8 KB · Views: 384
Last edited:
I start by wrapping the belt around the crank gear, then up to the intermediate shaft, then the cam. Its usually snug around that side, with slack on the far side of the cam gear, where the belt has to slide over the tensioner pulley. I've never started on the top and tried doing the crank last.

I ended up pretty much doing this except in a different order, but I did fit it around the tensioner pulley last which seemed to be the key.

Perhaps you might know, is it a big task to convert the early style 2 piece crank pulley to the later one piece? I had a hell of a time trying to remove it since my IPD crank pulley holder only works with the 1985 and onward crankshaft pulleys. The earlier 2 piece pulleys are slotted differently and I?d like to maybe convert my B21FT cars to the later style for ease of future removal. I tried googling and looking through the forum but wasn?t able to locate any info talking about the conversion. I don?t even know if that?s something people do, just figured I?d ask :-D
 
There isnt a b21/23 round tooth crank gear, so you'll need the square tooth belt.

Ah but there is. The R-Sport 16 valve engine, which is based on a B19 came with a round tooth belt although it's the narrow 8 valve belt width.

http://hiperformanceautoservice.com/images/R-Sport16ValveEngineCrankGear.jpg
R-Sport16ValveEngineCrankGear.jpg


You can switch to round tooth on a B21/23...but I dont know who makes/sells the right crank gear.

KL racing sells round tooth B21 crank gears for both 8 valve and 16 valve belt widths.

https://shop.klracing.se/sv/artiklar/staldrev-vevaxel-b21-for-ombyggnad-till-rundkugg-8v-bredd.html

https://shop.klracing.se/sv/artiklar/staldrev-vevaxel-b21-for-ombyggnad-till-rundkugg-16v-bredd.html

Perhaps you might know, is it a big task to convert the early style 2 piece crank pulley to the later one piece? I had a hell of a time trying to remove it since my IPD crank pulley holder only works with the 1985 and onward crankshaft pulleys. The earlier 2 piece pulleys are slotted differently and I?d like to maybe convert my B21FT cars to the later style for ease of future removal. I tried googling and looking through the forum but wasn?t able to locate any info talking about the conversion. I don?t even know if that?s something people do, just figured I?d ask :-D

The diameter of the crank snout is slightly different between B21 and B230. It's not going to be a simple conversion.

FYI, there's a special tool for holding the crank hub. It also works for the cam and I/S gears. I have a spare if you'd like to buy one.

http://hiperformanceautoservice.com/images/CounterholdTool9995034.jpg

CounterholdTool9995034.jpg
 
If you don't plan on changing the belt hub very often, you can make a TBcheap B21FT crank holder with a scrap of 3/4" plywood and a 2 1/8" hole saw (standard for house door locksets). Just bolt it down firmly before cranking:
Econo-B21-FT-Crank-Holder.jpg
 
If you don't plan on changing the belt hub very often, you can make a TBcheap B21FT crank holder with a scrap of 3/4" plywood and a 2 1/8" hole saw (standard for house door locksets). Just bolt it down firmly before cranking:
Econo-B21-FT-Crank-Holder.jpg

It?s not that I intend to be changing it often, but I have one other B21FT 240 that I?ll need to do the same thing to, and since I love collecting/rescuing the 4 eye turbo cars I imagine there will be more in the future; provided their CIS systems don?t piss me off to the point I just stick with the trusty grandpa series :lol:
 
Back
Top